Neurotic Stix Help

Here is some questionably helpful information about using Neurotic Stix Pro.
Product Page New Features Privacy & Terms Contact
Demo
Stix Basics
Learn how to use the main Neurotic Stix features.
How to Create Stix
You can either create your custom stix from the app, or from within Messages. Either method will add custom stix to your library.
Create Stix From the App
From the Neurotic Stix Pro app, select the “Custom” tab and pick a custom stix template.
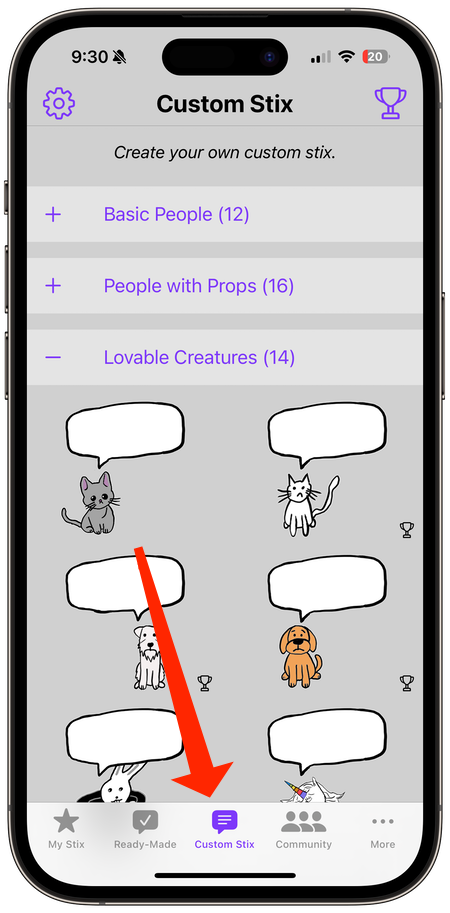
You can now add your caption. Some stix also allow you to make a few customizations (like changing the frowny face to a smile or adding some hair).
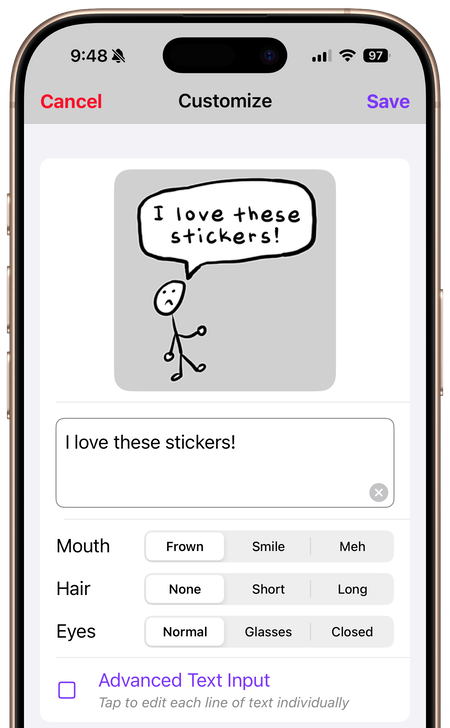
Tap the checkmark at the top-right to save when you’re done.
Create Stix From Messages
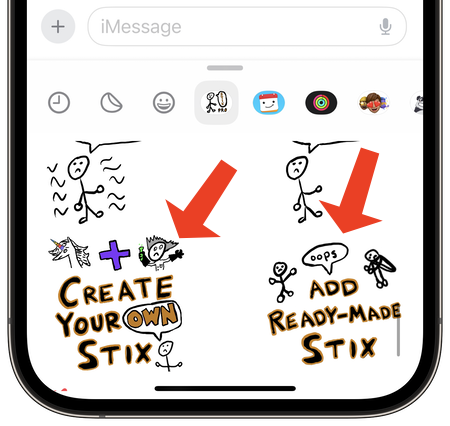
You can also create custom stix directly from the Messages app. Select the Neurotic Stix pro sticker pack, scroll to the bottom of your library, and tap “Create Your Own Stix”. (If you don’t know how to access the sticker pack, see How to Use Stix in Messages.)
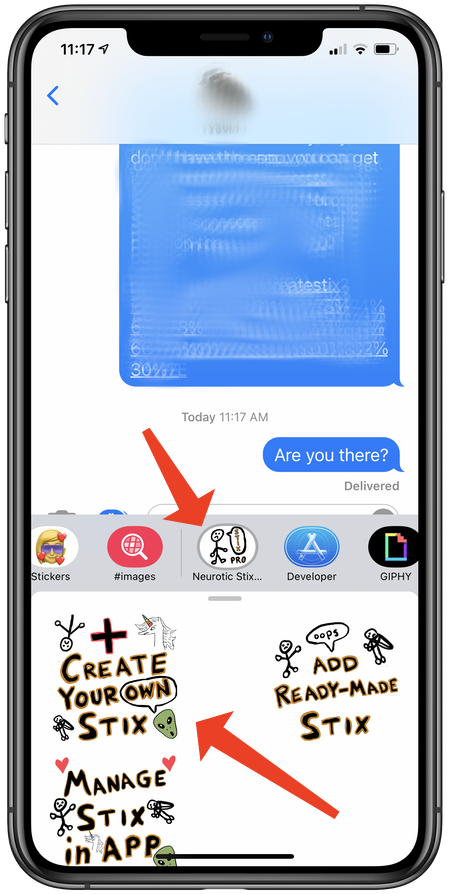
Then you’ll see the same interface for creating custom stix as you would from within the app.
How to Add Ready-Made Stix
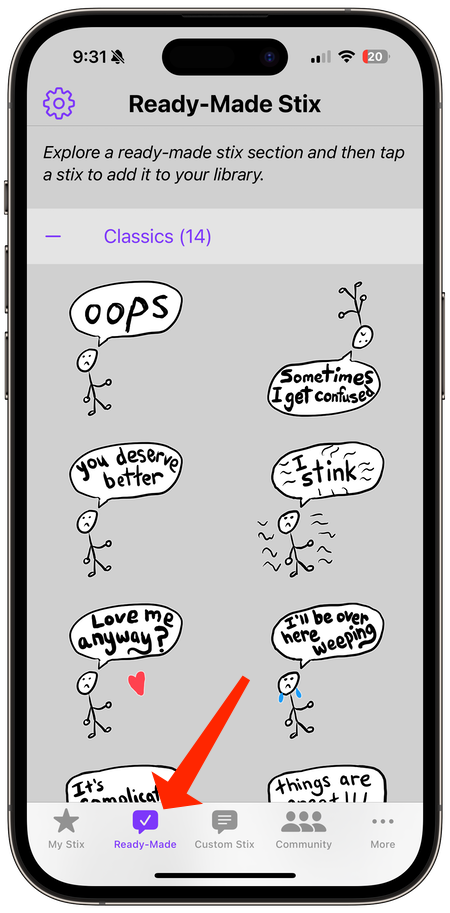
For lazy folks, I’ve created over 40 “ready-made” stix that you can use without requiring any creativity on your part whatsoever. Just tap on your favorite ready-made stix and they’ll get added to your library… Pretty cool, I guess…
From the app, tap the “Ready-Made” tab and tap the stix you want to add to your library.
You can also add ready-made stix directly from the Messages app. Select the Neurotic Stix pro sticker pack, scroll to the bottom of your library, and tap “Add Ready-Made Stix”. (If you don’t know how to access the sticker pack, see How to Use Stix in Messages.)
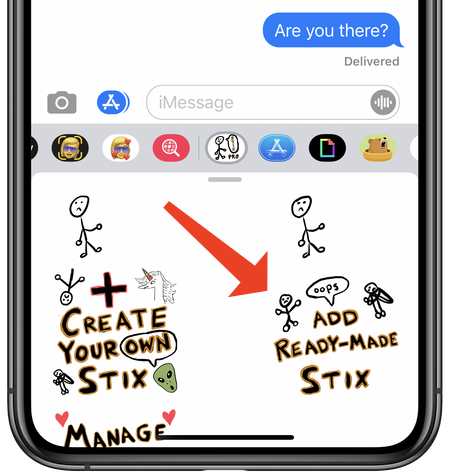
Then you’ll see the same interface for adding ready-made stix as you would from within the app.
Hope you like my ready-made creations, which are filled with all of my low-self-esteem love.
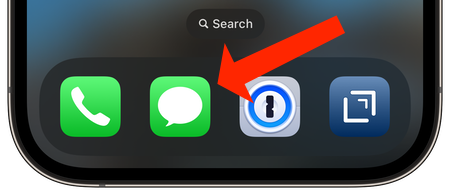
How to Use Stix in Messages
It’s easy to create and share stix using the sticker pack from within the Messages app. First, launch Messages.
From within a conversation, select the plus button near the Messages text field.
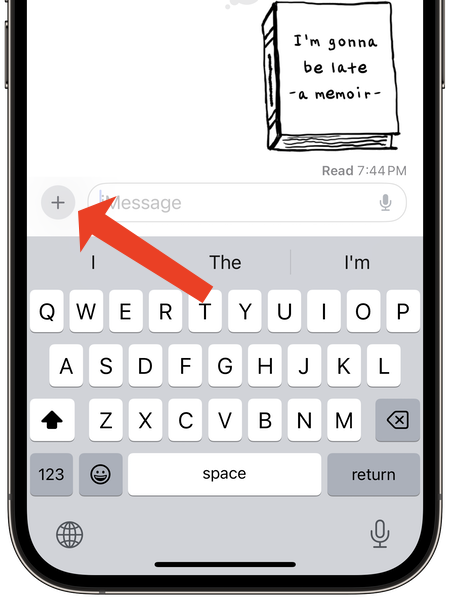
Select “Stickers”.

Tap the Neurotic Stix Pro icon, and then select the sticker from your library.
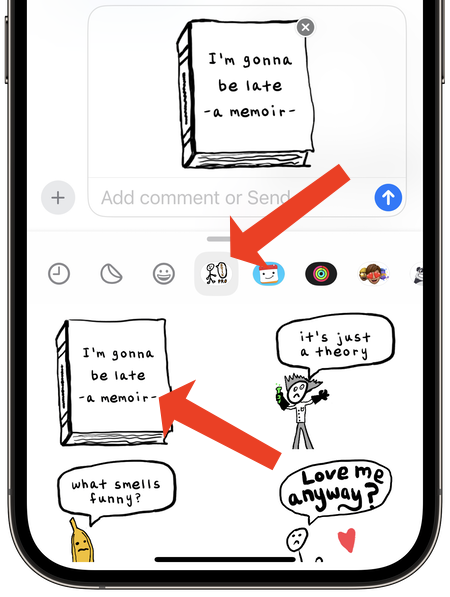
At the bottom of your library, you’ll see buttons that allow you to create or add stickers directly from within Messages.
NOTE: The stix you create with the app and the stix you create with the sticker pack are part of the same library and you can access them from either spot.
How to Share Stix
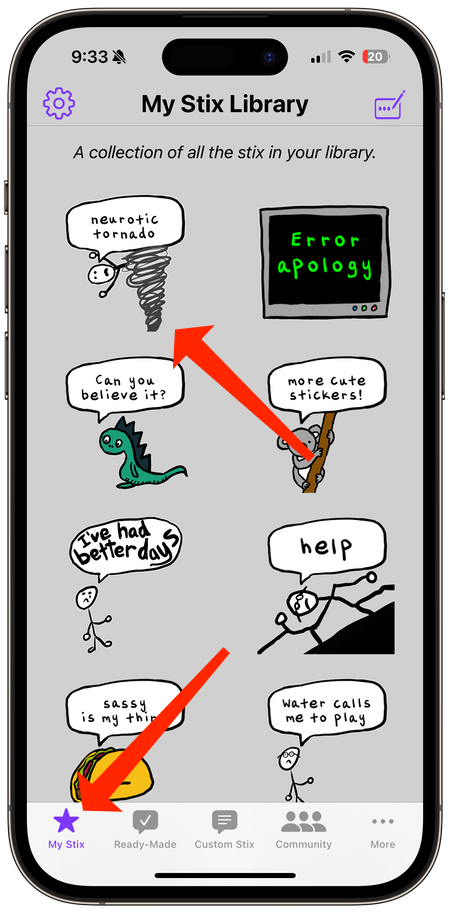
You can share the stix in many different ways (beyond just from within Messages). For instance, you can post your creations on Facebook, Instagram, Mastodon, or in an email. Start by tapping the stix from the “My Stix” tab inside the Neurotic Stix Pro app:
You have a few choices for how you can share the stix.
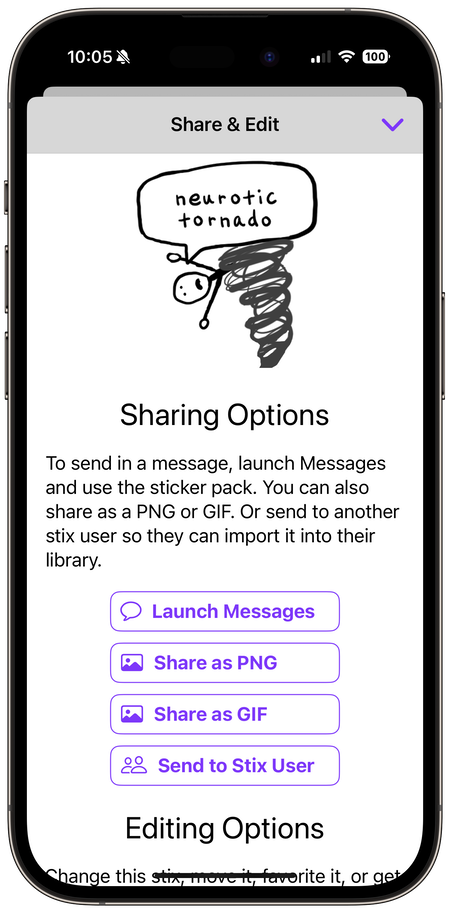
You can share it from the Messages app or share it anywhere as a PNG or an animated GIF. (Keep in mind when sharing a GIF that some social media sites don’t animate GIFs when you upload them. They’ll still show the image—they just won’t animate.)
If you share the sticker as a PNG or a GIF, the “share sheet” appears.
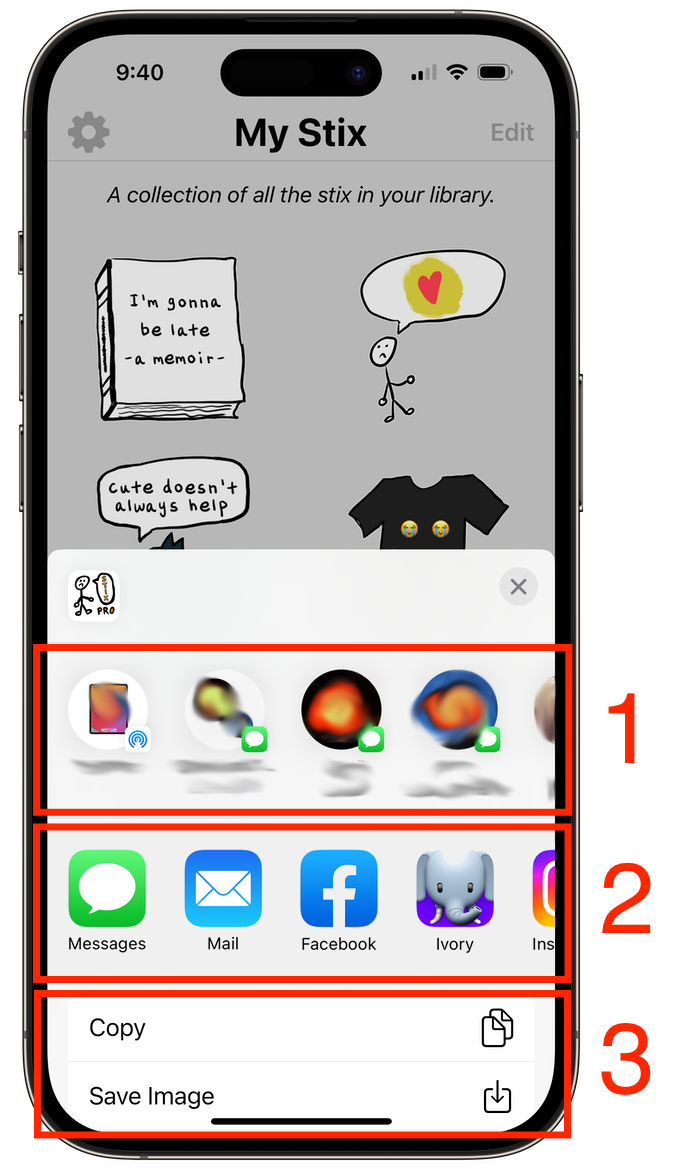
This screen looks different depending on what apps you have installed, but in general:
- The first section (1) is the “quick-share panel” and has some quick ways to share the sticker based on your recent activity.
- The second section (2) contains other apps you can send this sticker to. This is where you’ll see your social media apps, email, and a bunch of other things. This is a great way to create a post on Facebook, Instagram, or to create a new email. This row is configurable so if you don’t see what you want, scroll all the way to the right and configure it manually.
- The bottom section (3) contains a bunch of other useful actions. For instance, you can select “Copy” to copy the stix to the clipboard or use “Save Image” to get the stix into your photo library. Use “Copy” in order to “Paste” the sticker in a social media post, for example. Use “Save Image” to save the image to your photo library so you can get to the stix just like how you’d access any of your other photos.
How to Edit Stix
If you want to edit any of your existing stix, go to the “My Stix” tab and tap the edit button at the top-right corner.
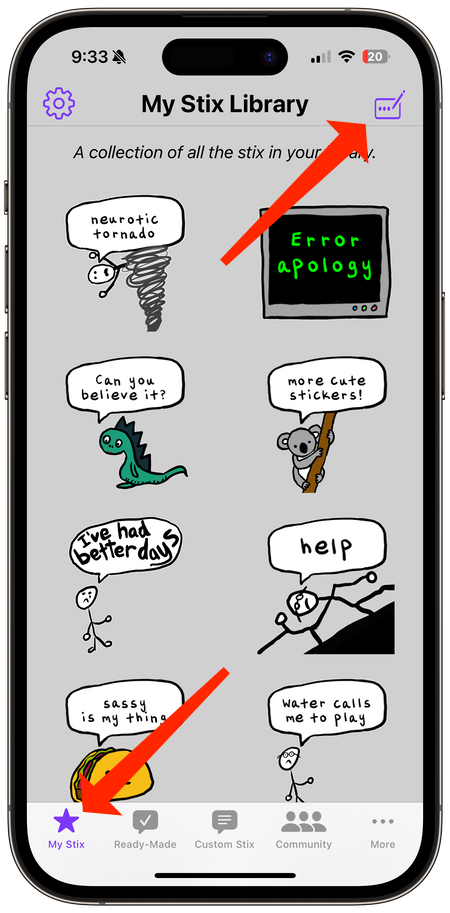
From here you can edit your stix library.
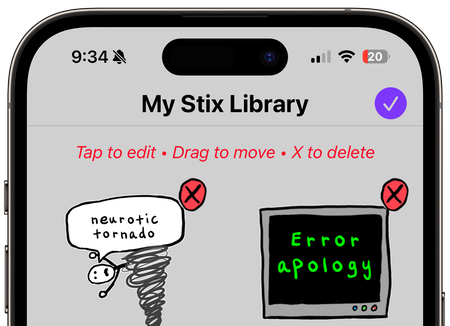
If you tap a stix, the “Share & Edit” window appears. Scroll down to the editing and organizing options.
- To move the stix to a different location, select “Move to Top” or “Move to Bottom”.
- To change the stix contents (like the text), select “Edit Stix Contents”.
- To change the stix template that you’ve chosen, select “Change Stix Type”.
- To create a new stix based on this stix, select “Duplicate Stix”.
- To delete a stix, select “Remove Stix”.
NOTE: You can’t change the stix contents or the stix type for ready-made stix. These options are only available for custom stix.
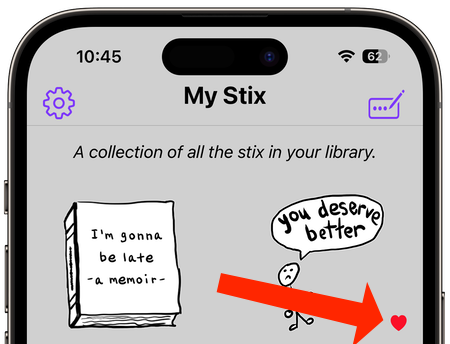
How to Mark a Favorite
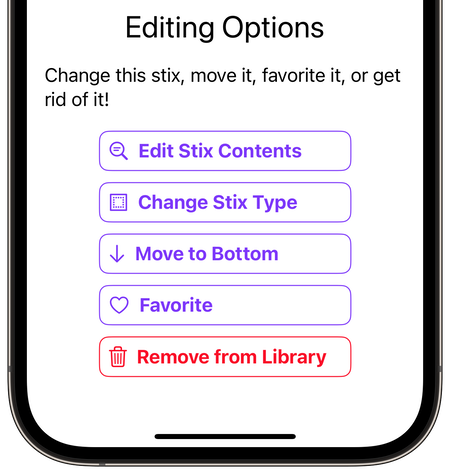
You can favorite stix in order to display them more easily in a widget and to manage them more easily in the app. To favorite (or unfavorite) a stix, go to the Neurotic Stix Pro app and tap on any of the stix in your library. When the “Share & Edit” page appears, scroll to the “Organizing Options” section and select “Favorite”.
You’ll know which stix are your favorites because they’ll have a heart at the bottom right.
To unfavorite a stix (not that you’d ever want to do that to your precious stix), tap the stix again and select “Unfavorite”.
If you’ve added a Library Widget to your home screen, you can specifically configure the widget to show your favorites.
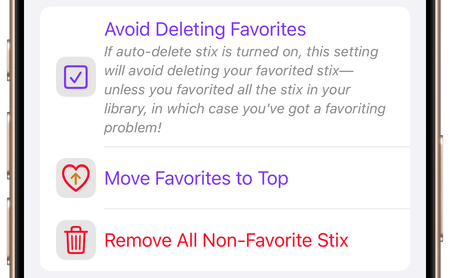
You can also perform special actions on your favorite stix from the app settings.
How to Organize Tabs
You can organize your tabs by tapping the “More” tab from the tab bar.
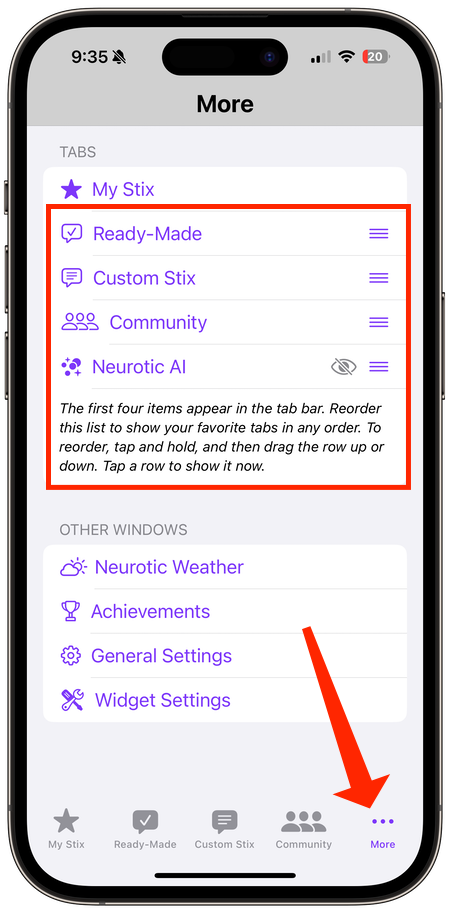
If you tap on one of the tabs, you’ll go right to that tab. But you can also reorder the tabs with the up/down buttons. Just keep in mind that only the first four tabs show up in the tab bar (and the first tab has to be the “My Stix” tab). So make sure your favorite tabs are towards the top.
back to topSpecial Features
Learn how to use some of Neurotic Stix’s fancy pants features.
How to Use the Widgets
To add a widget, tap and hold anywhere on your home screen for a few seconds. When the apps start jiggling, tap the plus icon at the top of the screen.
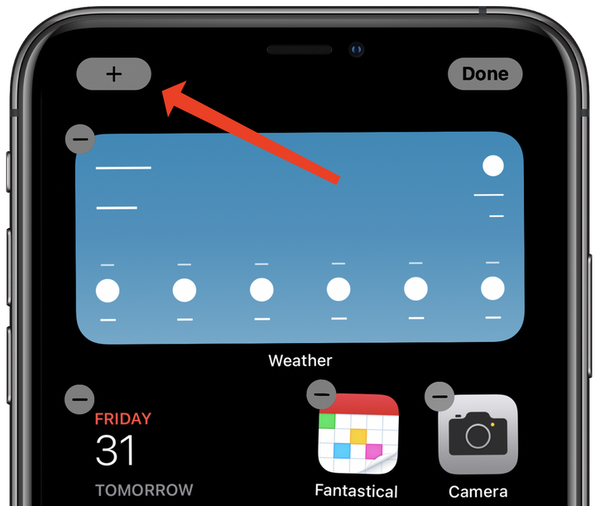
Select Neurotic Stix from the list of widgets.
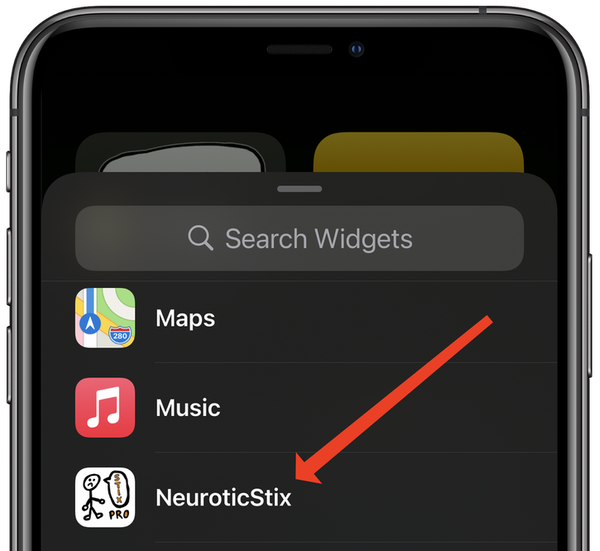
You can pick from various widget types:
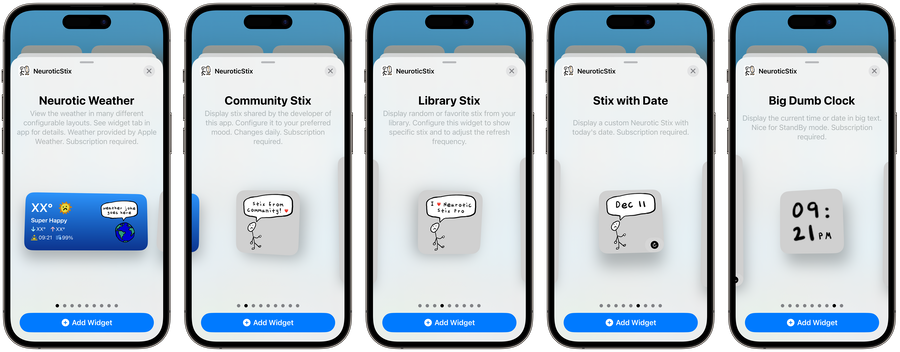
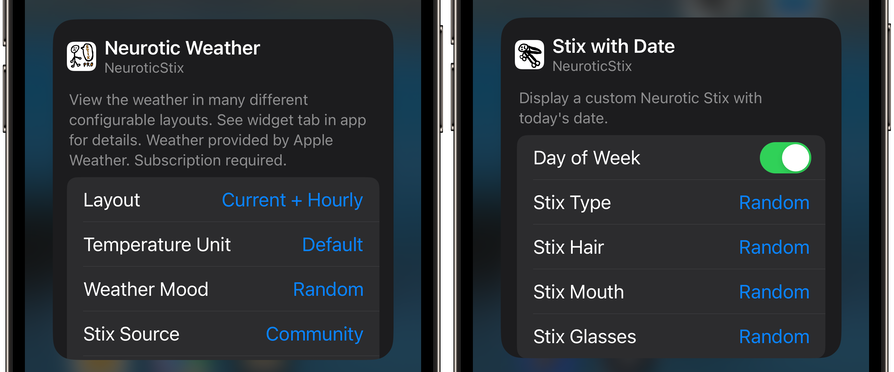
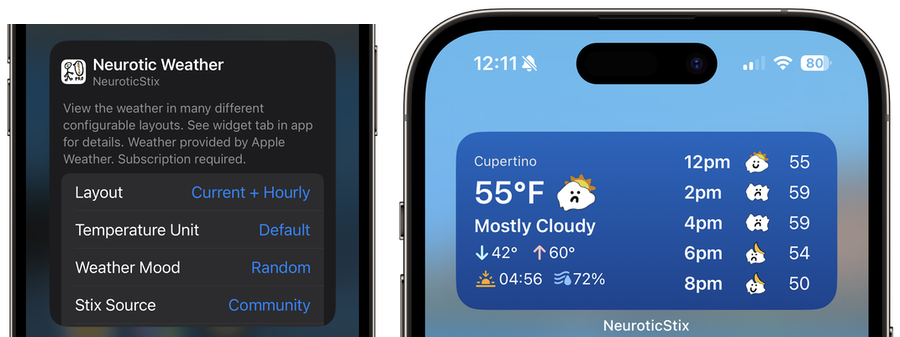
- Neurotic Weather (and Neurotic Weather Mini!): View the weather in several sizes and many different layouts. Tap the widget to open the Neurotic Weather page, which is where you can update the location. See How to Use Neurotic Weather.
- Community Stix: Displays stix shared by the developer of this app. You can configure the mood of this widget: optimist, pessimist, weird, or random. Changes daily. Once placed on your home screen, tap the widget to have the option to add the stix-of-the-day to your library!
- Library Stix: Display random or favorite stix from your library. Configure this widget to show specific stix and to adjust the refresh frequency. See Tips When Using the Library Widget.
- Stix with Date: Shows the current date on a stix. You can configure which stix shows the date.
- Big Dumb Clock: Shows the current time, date, or day of the week. Not that amazing, but could be useful with iOS’s new StandBy feature.
Place your preferred widget wherever you want on your home screen. Can’t decide which widget to use? Use more than one!
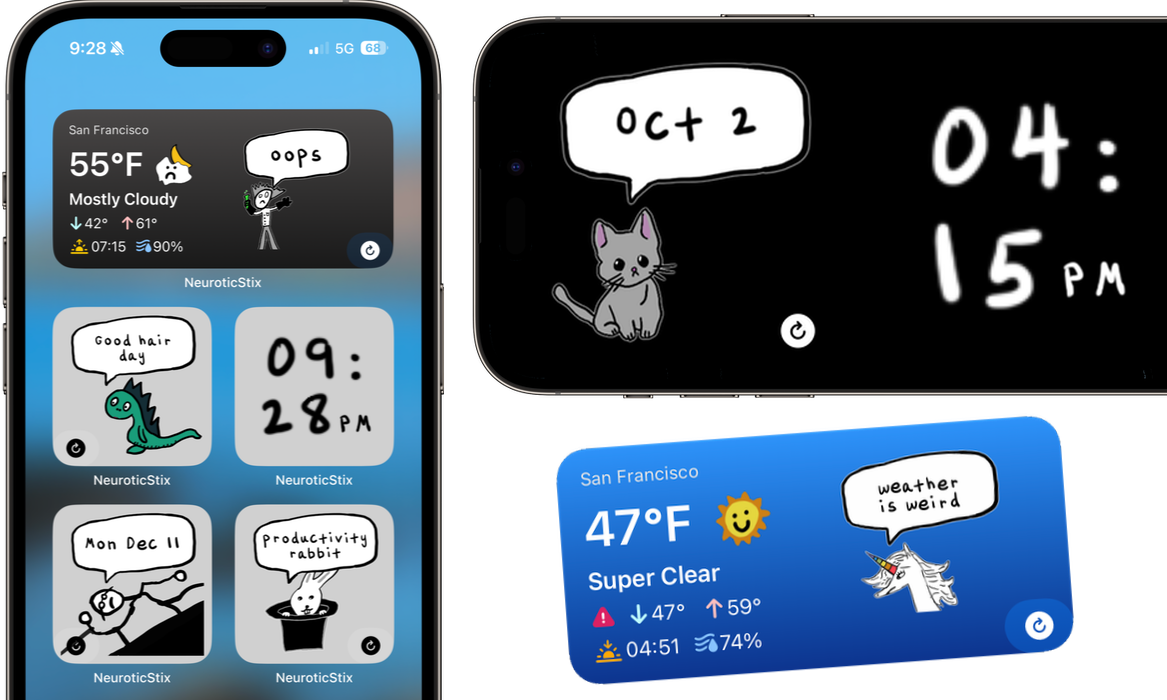
You’ll see a refresh button at the bottom of any widget with a stix that can change from day to day. Just tap that button to refresh the stix. If you tap the widget anywhere else, it opens the Neurotic Stix app.
Configuring a Widget
If you want to configure a specific widget, tap and hold that widget, and then select “Edit Widget”.
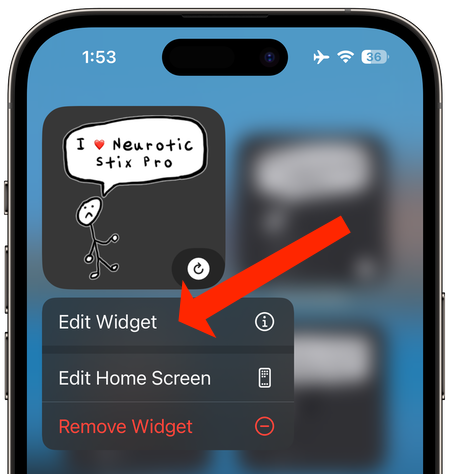
From here, you can configure the widget. Each widget type has a slightly different configuration screen, but the settings should be pretty straightforward.
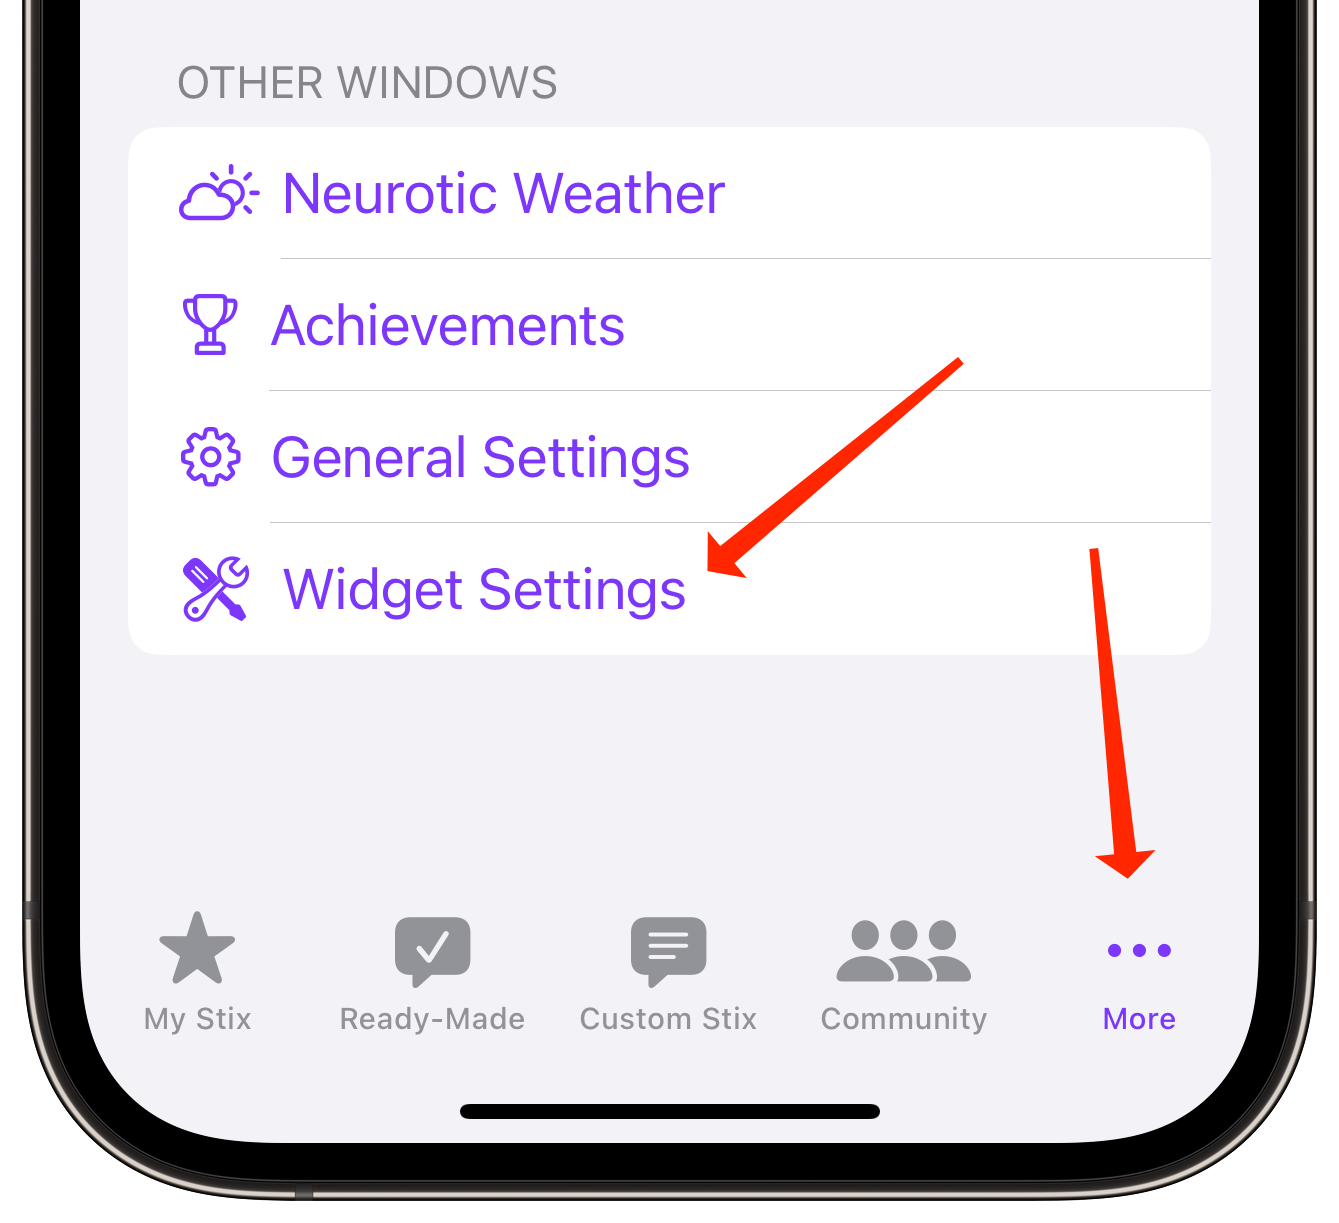
You can also configure some global widget settings from the Widgets Settings within the Neurotic Stix Pro app. Select the “More” tab and tap “Widget Settings”.
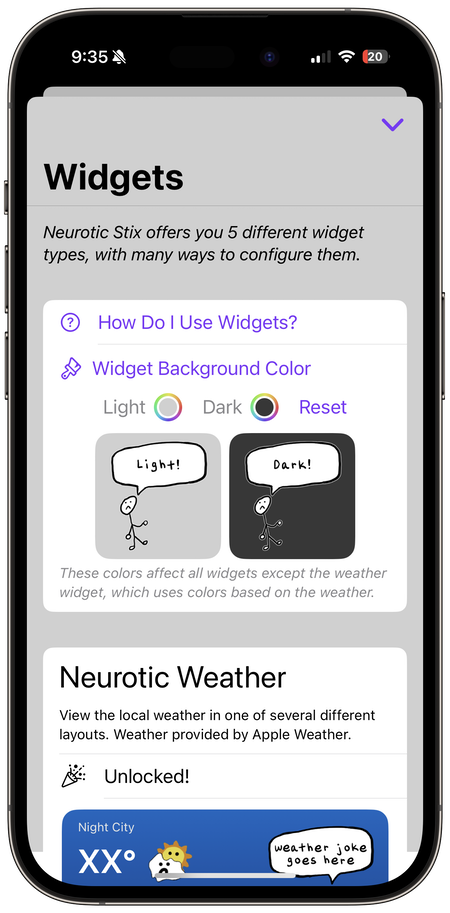
From this page, you can change the widget background colors and other global widget settings.
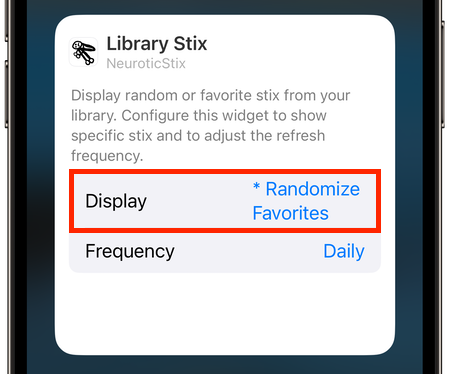
Tips When Using the Library Widget
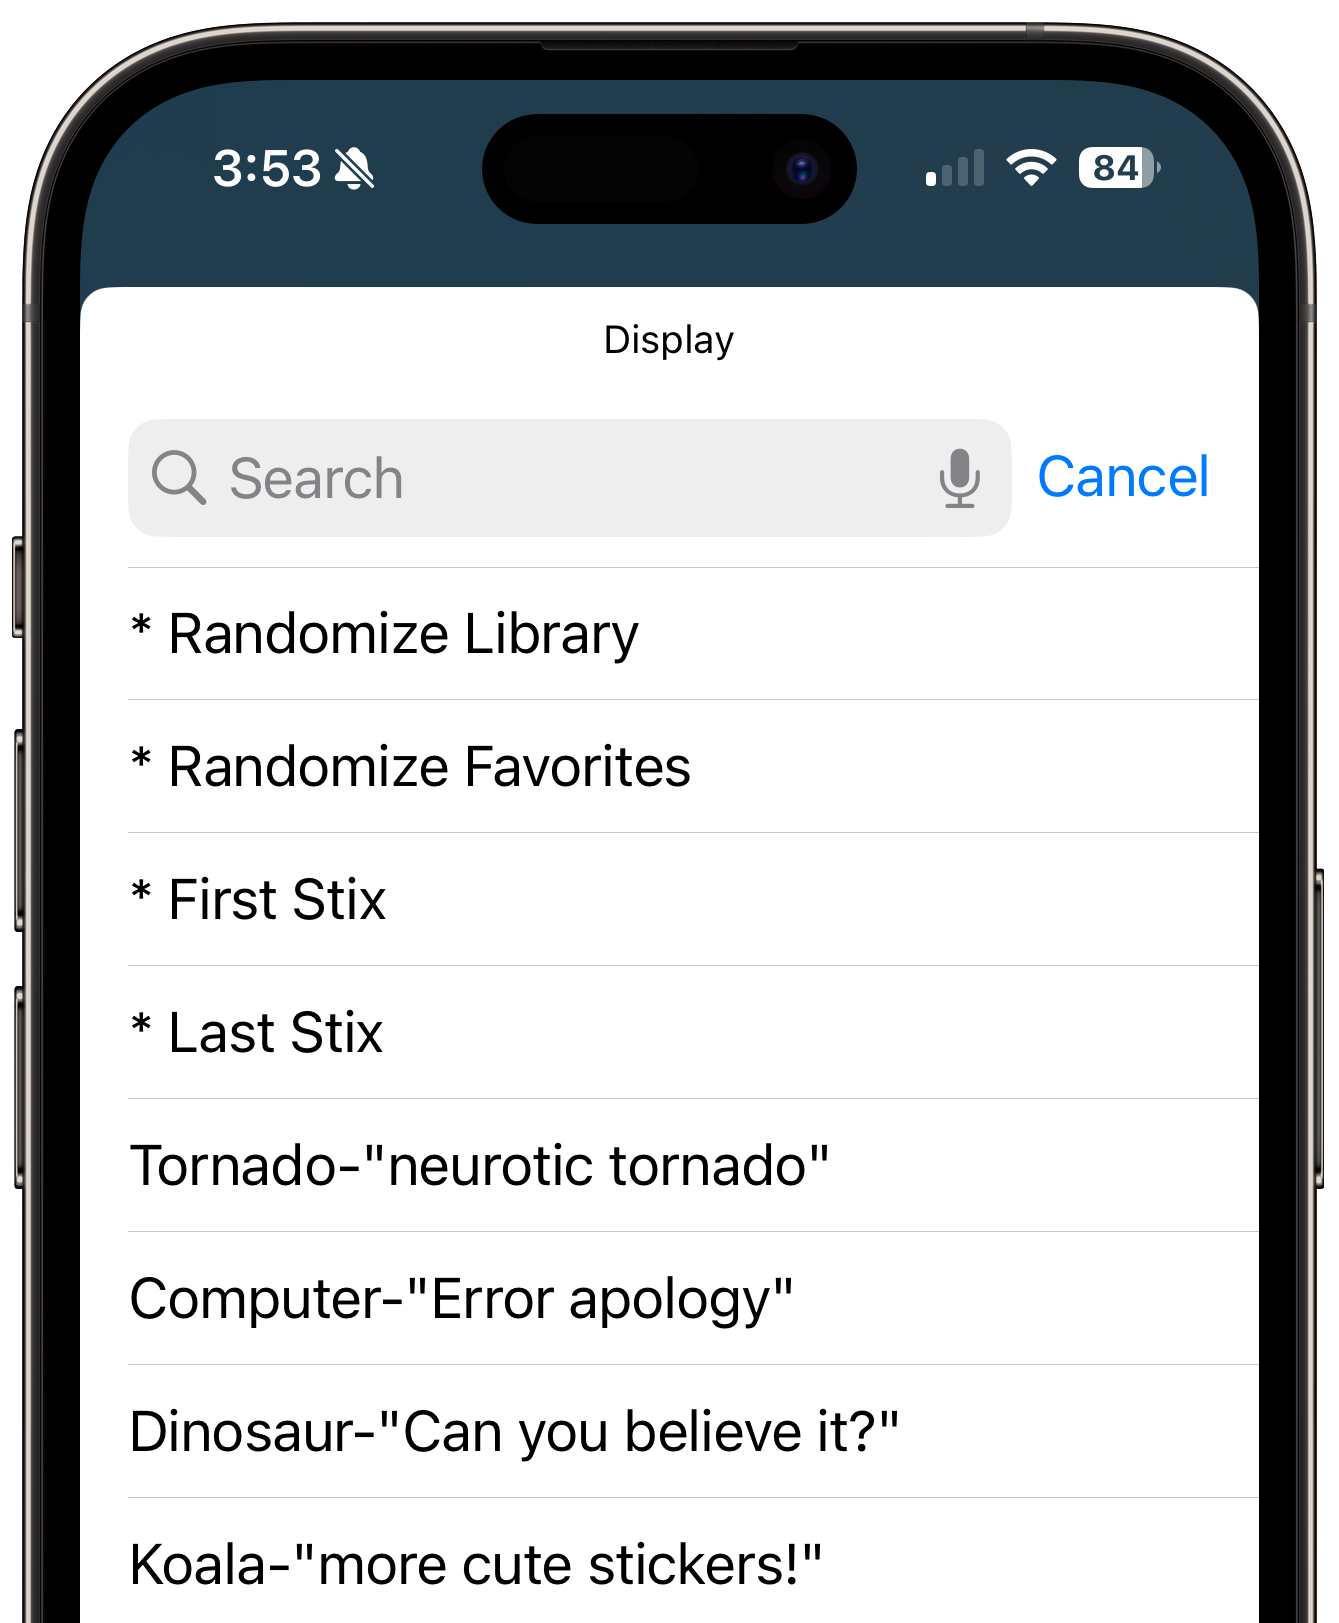
The library widget shows stix from your library. When configuring the widget, the “Display” field lets you decide what to display. The “Frequency” field lets you decide how frequently the widget updates (if applicable).
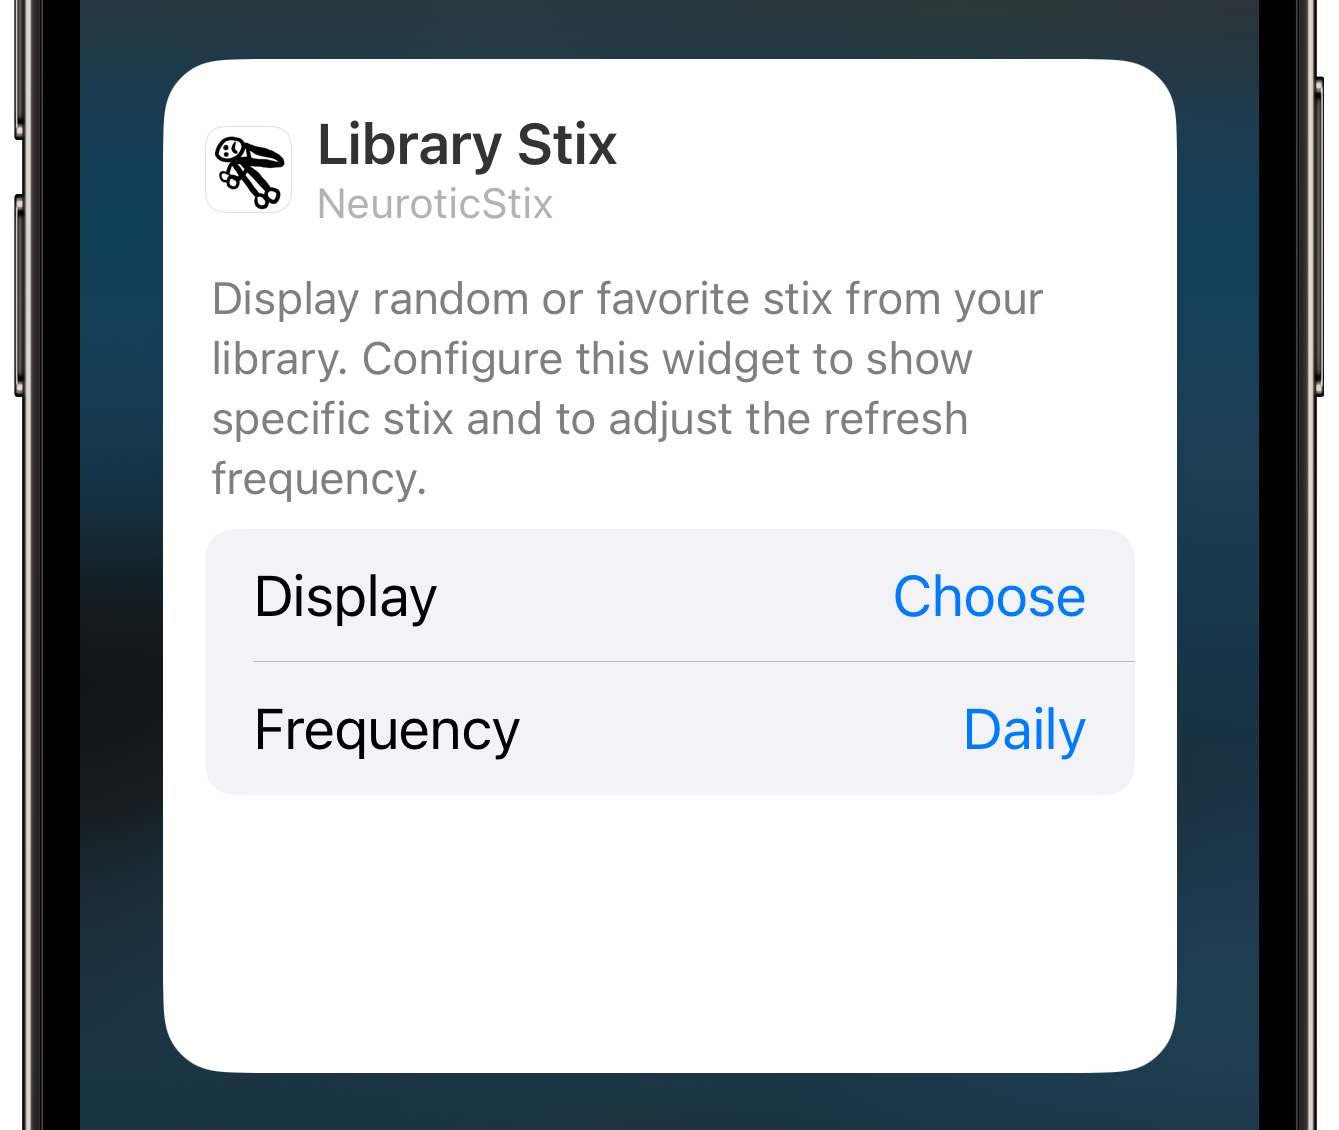
The “Display” field allows you to display random stix from your library (“Randomize Library”), random stix that you favorited (“Randomize Favorites”), the first or last stix from your library (“First Stix”, “Last Stix”), or you can pick from any specific stix in your library.
How to Use Neurotic Weather
Neurotic Weather is a feature that subscribers can access from a widget and from the app. You can add the weather widget just like any other Neurotic Stix widget. There are two different weather widget sizes. Each widget is configurable using many different layouts that you can set when you configure the widget.
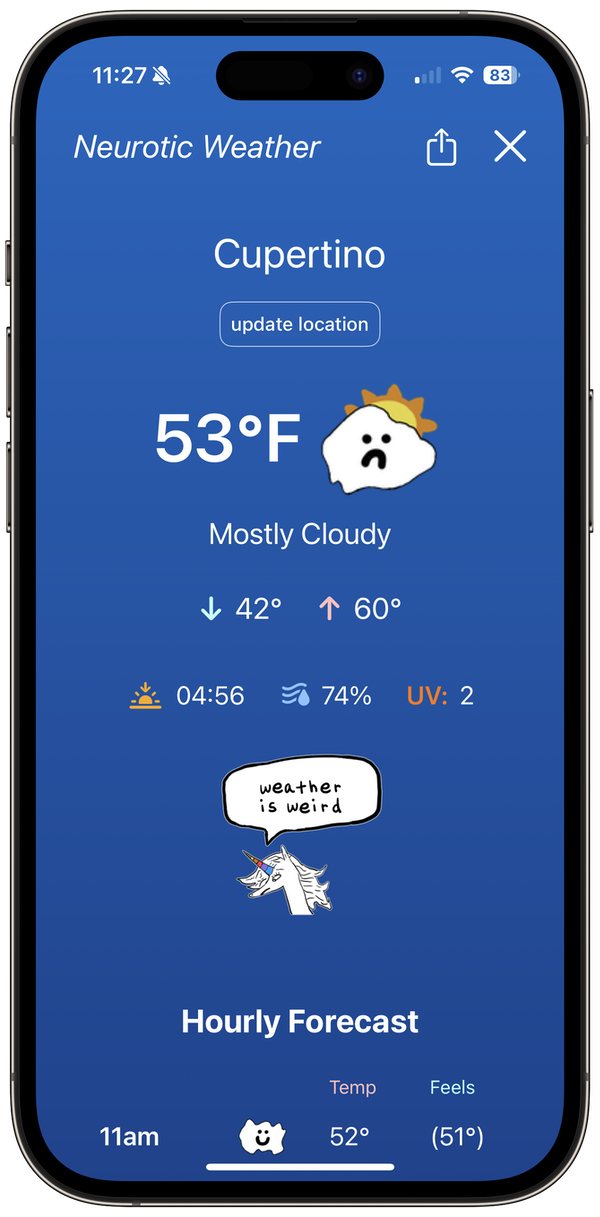
When you tap the widget, it opens the Neurotic Weather page from within the Neurotic Stix app. This page contains more weather info, lets you update the location, and also lets you share the current weather with another person or app.
You can also access the Neurotic Weather page while in the app. Go to the “More” tab, scroll down the page and select “Neurotic Weather”.
The first time you add the widget or view the page, you’ll need to provide a location. Tap the widget to open Neurotic Weather.
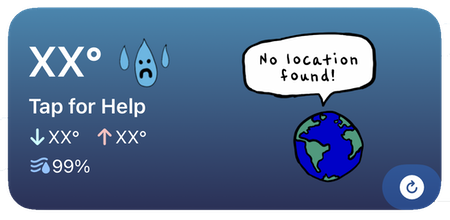
When Neurotic Weather launches without a set location, it asks to search for your current location. You can allow the app to search for your current location, or you can manually search for a specific location.
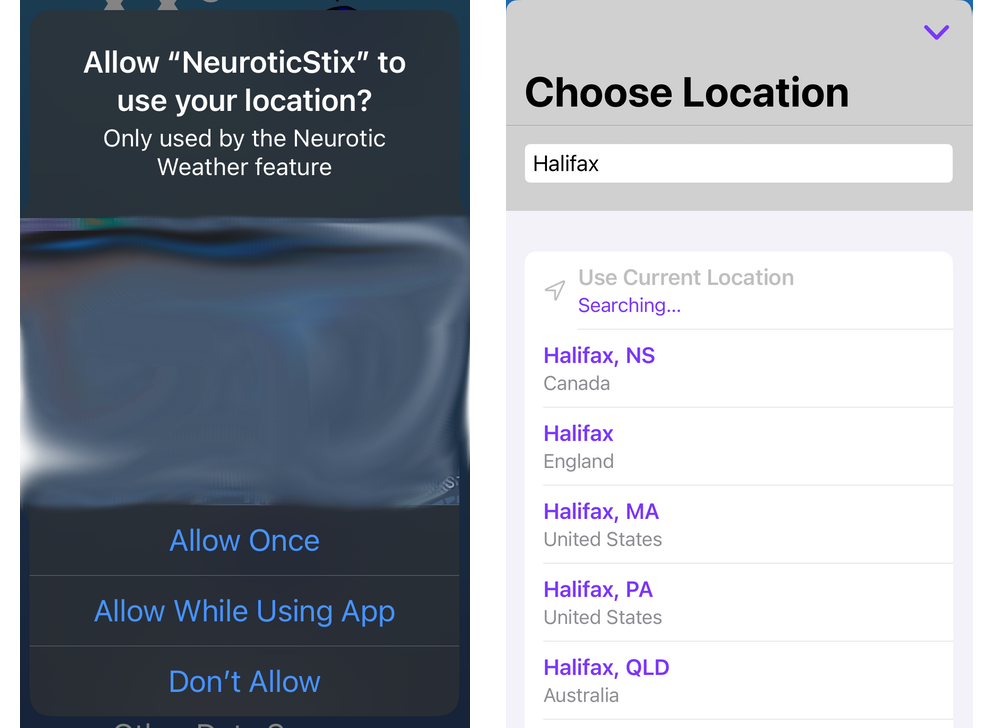
If you run into issues searching for your current location, make sure that the Location setting for the app (“Settings > NeuroticStix > Location”) is set to While Using the App.
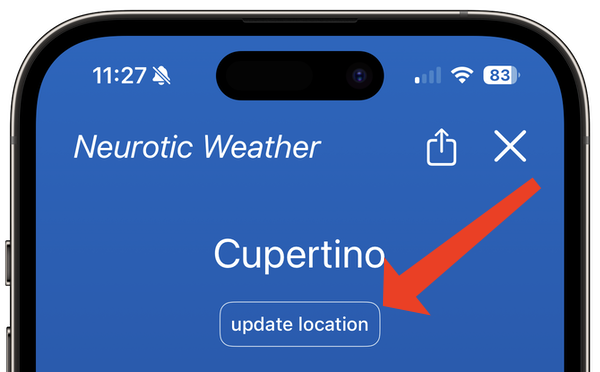
After specifying a location, Neurotic Weather uses that location for weather forecasts until you explicitly ask it to update the location using the update location button.
If you run into issues getting weather information, check that the device has a valid internet connection. Since the app uses Apple’s WeatherKit for weather information, you can also check Apple’s system status to ensure that the Weather service is online.
How to Use Neurotic AI
Neurotic AI is an experimental feature that lets you create neurotic stix from an AI prompt. Each prompt results in some AI-suggested stix. You can add them as is to your library, or you can edit them before importing.
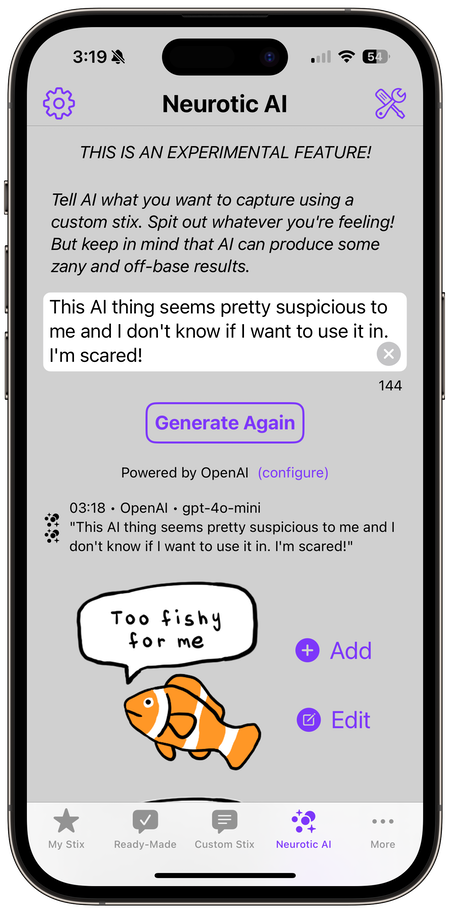
To get started, select the “AI” tab in the app. If you don’t see it, select the “More” tab and tap “Neurotic AI”.
Use Apple Intelligence (on supported devices running iOS 26) or another configured AI provider (OpenAI, Anthropic, Google Gemini). To configure Neurotic, tap the (configure) button below the prompt, or click the gear icon at the top-right corner of the screen. Then you’ll be able to pick your provider and update other settings as needed by the provider.
- Apple Intelligence works on-device and is free and doesn’t require any configuration. However, it requires iOS 26 and a device that supports Apple Intelligence.
- For the non-Apple providers, you’ll need to create an account with one of these providers and then create an API key with that provider (OpenAI key help, Anthropic key help, Gemini key help). In some cases, it’s free to set up an account and create a key; in some cases, you may need to add a small amount of money to a developer account for that provider. You’re responsible for costs with this provider. A Neurotic AI request is typically under 1600 input tokens and under 350 output tokens. Check the per-token cost for your selected provider and model. By default, Neurotic Stix selects a cost-effective model, but you can change the model. ALWAYS review billing information from your selected provider. Once you’ve saved your settings with an API key, you can start asking Neurotic AI to generate stix for you.
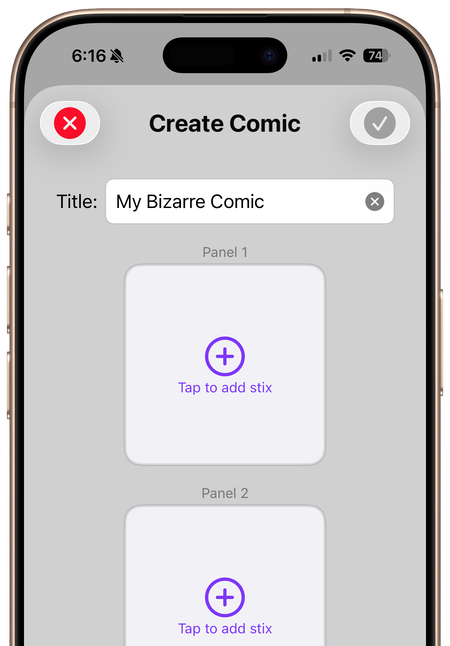
How to Make Stix Comics
Stix Comics lets you create simple 3-panel comic strips. It’s perfect for telling quick jokes, sharing silly observations, or just being over-dramatic about your day.
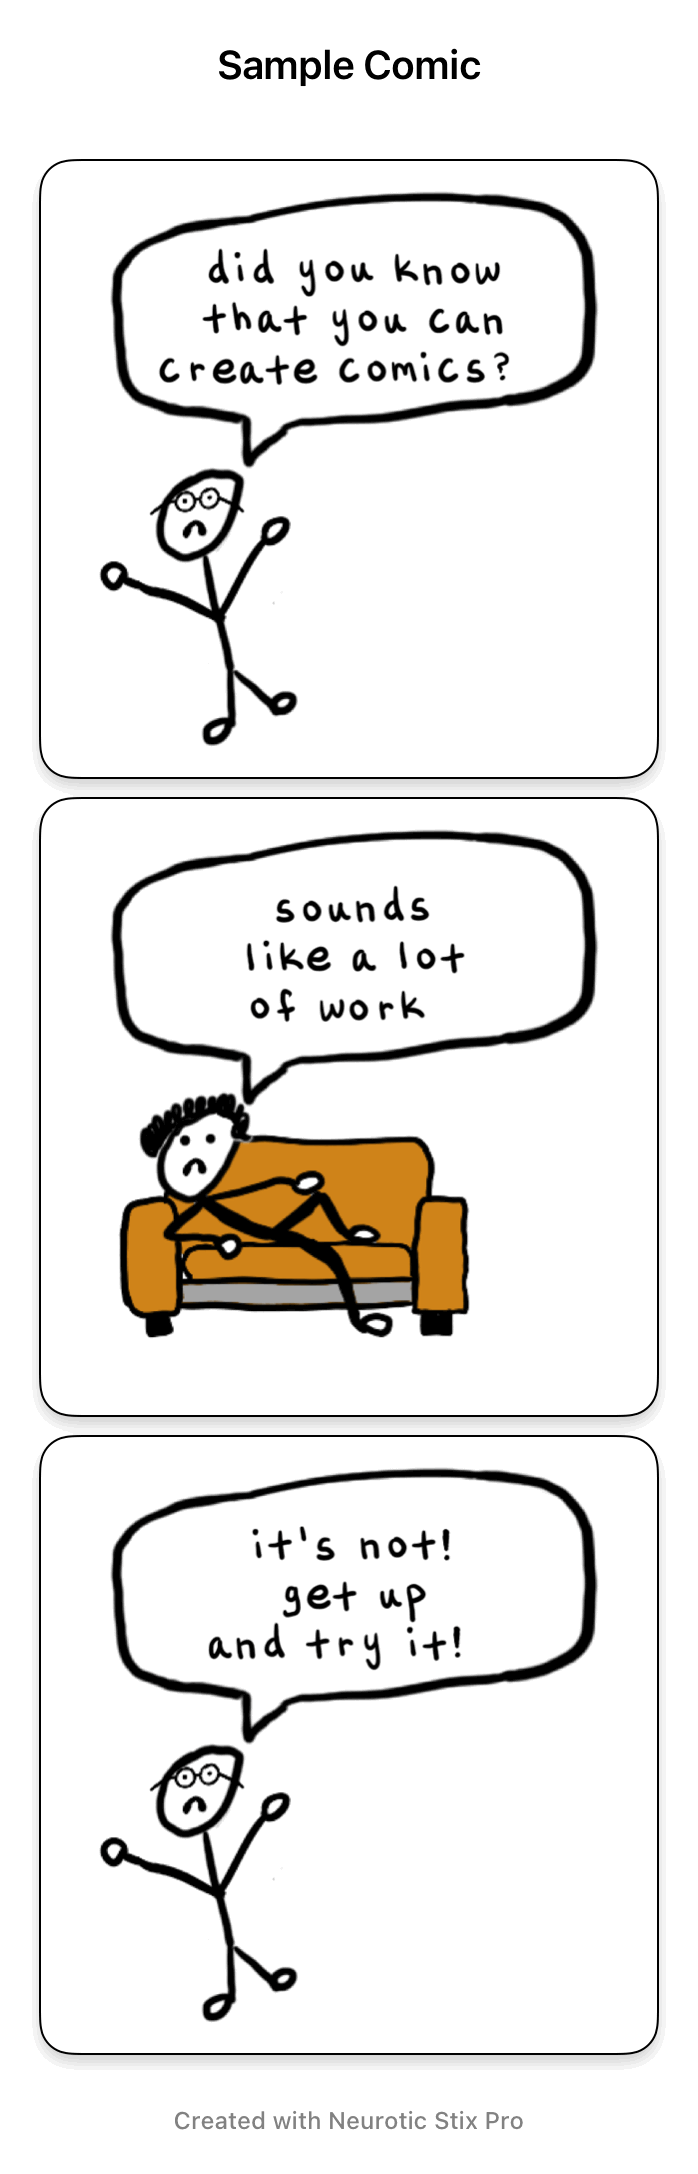 |  | 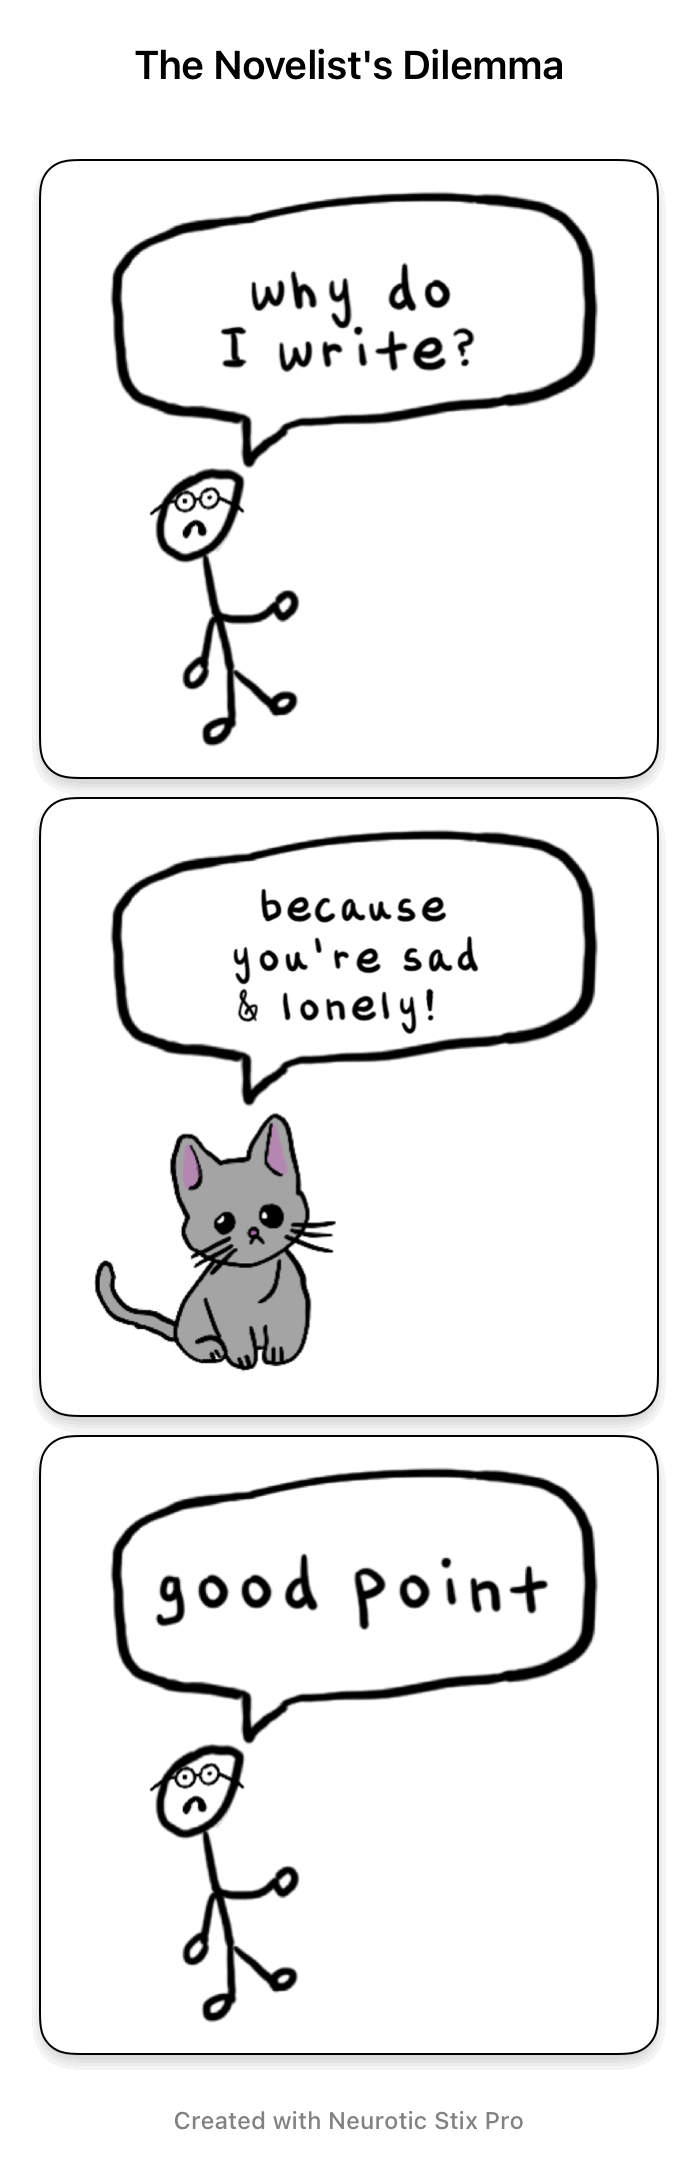 |
To get started, select the “Comics” tab in the app. If you don’t see it, select the “More” tab and tap “Stix Comics”. To view, share, or edit a comic, tap the comic thumbnail.

To create a comic, tap Create New Comic and you’ll see three empty panels waiting for your creative genius. Tap each panel to add a stix from your library, or create a custom stix just for that comic. Give your comic a title and tap the checkmark when you’re done.
How to Add Daily Stix from the Community
Every day, you can see three questionable daily stix from the community in the “Daily” tab. If you don’t see it, select the “More” tab and tap “Community Stix”.
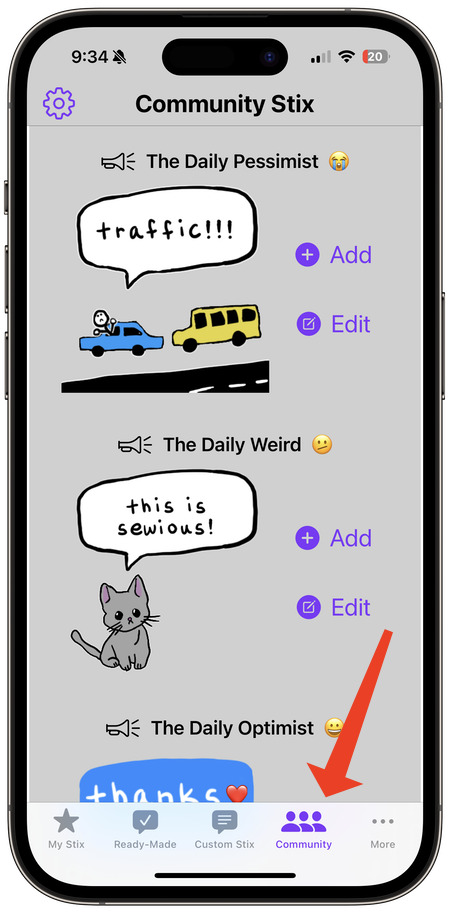
One stix is for the “optimist”, one is for the “pessimist”, and one is just “weird”. (But don’t take these categories too seriously, they just roughly give you the gist of their tone.) Anyway, you can add any of them to your library or edit them a little bit before adding.
How to Get Starter Stix
You can get a random assortment of starter stix from the community if you want to build up your library quickly. There are two ways to add starter stix to your library.
If you have less than ten stix in your library, you’ll see a button at the bottom of your library to get starter stix.
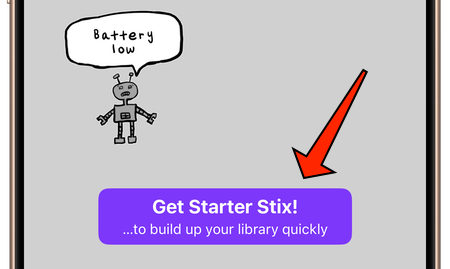
You can also add starter stix from the “General” section of the settings page.

In either case, you’re initially prompted to pick a starter stix “mood”. The mood options are: Optimist, Pessimist, Weird, or Mix It Up! From there, you’re offered up to 21 stix (from over 900 community stix options) and you can pick and choose which ones to add to your library.
You can’t add starter stix if your library already contains more than 40 or so stix in it.
back to topTroubleshooting
Apple Intelligence isn’t working on my Neurotic AI tab.
Apple Intelligence requires iOS 26 and a device that supports Apple Intelligence. You then have to make sure that Apple Intelligence is enabled from your device’s settings. (Also, after you enable it, it takes a few minutes for it to be available.) Check out How to Use Neurotic AI.
I can’t find a tab, or my tabs aren’t in the right order.
Check out How to Organize Tabs.
My widget went blank!
Your widget may turn blank if there’s been a major app update that has affected the widget configuration.
Oftentimes, restarting your device fixes the problem.
If that doesn’t work, remove the widget and add it back to the home screen.

Need help removing a widget? Check out these instructions from How-To Geek: How to Add and Remove Widgets from the Home Screen on iPhone.
Messages sticker pack shows a blank screen!
In some situations, just after you update the app from the App Store, the Neurotic Stix Pro sticker pack shows a blank screen in Messages.

Try to force close the Messages app.
When you relaunch Messages, the Neurotic Stix Pro sticker pack should be happy again and all your precious neurotic stickers are back.
Contact
If you actually want to contact the neurotic developer, use this half-baked form, or send him a message on Mastodon or Threads or Bluesky.
back to top